
Let's look deeper into AWS serverless services and try to make our S3 copy tool.
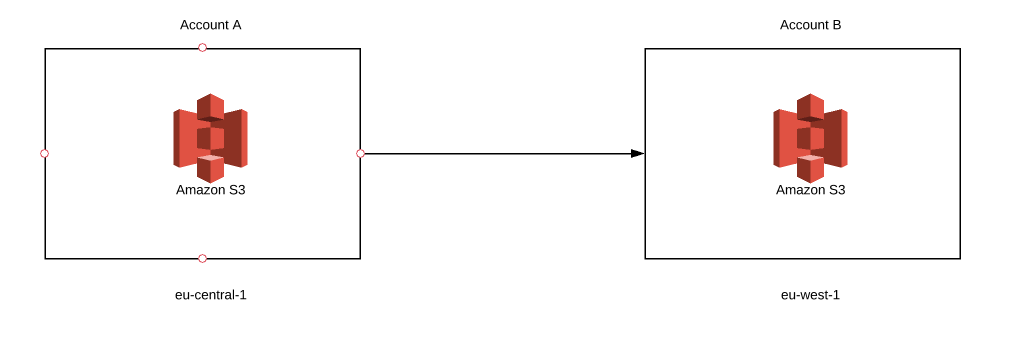
Hello, my friends! Today, we are going to look deeper into AWS serverless services and try to make our S3 copy tool. What exactly do we want to create? Imagine that you have some objects stored in S3 bucket on account A but, for some reason, you decided to copy all your objects to another S3 bucket. So, where’s the problem? Well, your second bucket needs to be created on account B. Let’s complicate things a bit more. Your second bucket will be in a different region. And to make it even more hardcore, we will use fargate to create it. Sounds difficult? Maybe a little, but with serverless we can achieve success. So, let’s get started!
If you read my previous article, you should know about another serverless service called Lambda, which is also a tool we could use for our purposes. So, why are we not going to do it? Unfortunately, the copy process between two buckets can take a while. Depending on the amount of data, it can last seconds, hours, sometimes even days. Lambda’s execution limit set to 15 minutes is, without question, the main reason why we will avoid it in this case. Instead, we will focus on a container service. Once again, we have to consider two options - running it with EC2 or Fargate. So, why did I decide to use the latter? As it was mentioned before, it is serverless. To use EC2, we need to configure an extra server for running our container task. In short, we go to the EC2 page, select the proper instance type (which sometimes is not so easy), define some traffic rules and launch it. Now, what problems can this cause? If we select an instance that’s too small for our task, it will suffer from lack of memory. If we choose one that’s too big, we will pay extra money for unused capacity. The next problem is managing EC2 after launch, because pathing, updating or dealing with secure issues becomes your responsibility. As a result, you waste a lot of time managing and operating your EC2 instance. With fargate service, we only pay for what our task uses during execution. What’s more, all underlying infrastructure is managed by AWS. So, instead of focusing on your environment you can concentrate on developing your application. Quite a useful option, don’t you think? I hope the discussion about using fargate is behind us and we can move to something more interesting, like building our application.
First of all, you need to create 3 roles.
First two roles are obvious, but why do we need the third one? When we use Fargate service, we can’t assume other roles without permission and we can’t put two roles inside one container. That’s why we have to create an extra one that enables us access to both.
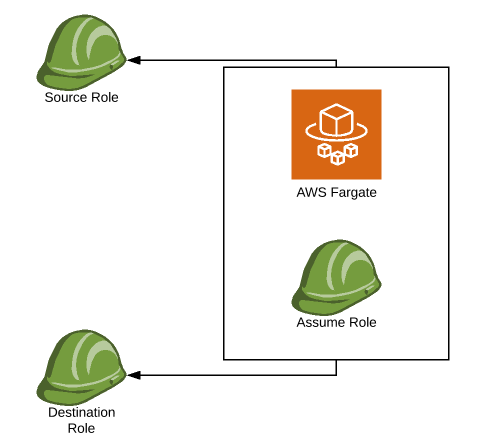
IMPORTANT: When we assume a role inside our code, we always have to use a container role. If we assume a source role, and then try to assume a destination role using source credentials, it will fail due to a missing assume role permissions. If we want to get credentials from first and second role simultaneously, we have to start with creating sessions of container role.
Now, we can assume both roles (it can also help with refreshing tokens - I will describe it in the next article).
Once we retrieve credentials from both roles, we are ready to create our s3 clients/resources.
Above objects give access to the source bucket and its content. We can use destinations_credentials in the same way to get access to the destination bucket.
There is one more step we need to take in order to make our app work. We have an object that gives access to the source bucket and another one that gives access to the destination bucket, but it’s impossible to use them both in the copying process.
We need to enrich our source bucket with policy that enables access using destination credentials.
First, we will get an account number of a destination bucket. It will be needed in our policy.
IMPORTANT: You need to create sts client by using destination assume role credential. When you create boto3 clients, using s3 service, create one more with sts.
That's a policy which allows us to access the bucket with destination permissions. I hope you read my previous articles, but I will explain the resource part in case you didn’t.
Finally, we can put our policy into source bucket:
At last, we can forget about the source client/resource object and from now on use only destinations.
When it comes to copying s3 objects, there are two possible scenarios we need to consider. Use an already created bucket or create a new one. To make it more interesting, we will try to create a bucket.
IMPORTANT: Remember to use different names of your destination bucket as the namespace of buckets is global. There is no way to create two identical bucket names (even on different accounts).
That’s the simplest way to create a bucket. But in which region the bucket will be created? The answer is simple, in the region where fargate and your containers are created. We didn’t include the region name in any previous steps, so the region will be taken as default. To create bucket in different region, we need to do two things.
1. Create a client with extra flag region.
You can swap ‘region’ with any valid AWS region, like eu-west-1- eu-central-1, us-east-2, etc.
2. Add extra flag to bucket creation function.
Just like in step 1, you can put any valid region in place of ‘region’.
IMPORTANT 1: Client region and region inside bucket function must be the same. Differences between those values will cause IllegalLocationConstraintException.
IMPORTANT 2: There is one unique region, us-east-1, that doesn’t need an extra flag in the bucket creation function. Still, a client needs to be created in us-east-1. Why it works that way, remains a mystery…
Copy process is quite simple. We need to retrieve all bucket keys and then copy them all with the copy_object function.
IMPORTANT: Remember to use the destination client when copying objects. We enriched the source bucket so it could be accessed with destination credentials. As a result, using source credentials will cause access denied to destination bucket, because its policy will be set to default values.
That’s all, you have your working app copy which can be launched on fargate. Now, let’s explain how we can run it.
IMPORTANT: Remember to read parameters inside the code before generating applications image. If you forget about this, you will need to add extra lines and generate a new image, and then repeat the next steps twice.
I recommend you read my previous article where I’ve thoroughly described what happens during each step of creating/deploying your image. Here, I will do it very briefly. So, let’s create your image.
FROM python:alpine3.6
COPY . ~/Desktop/python_image/image
WORKDIR ~/Desktop/python_image/image
RUN pip install -r requirements.txt
CMD python ./migrator.py
Here’s your docker file that will create your image. To execute, just type the following in terminal.
IMPORTANT: migrator.py is my execute module, change it to your module’s name.
If everything went well, you should get your image id which will be used to put your image inside ECR.
Log into your AWS management console and open ECS service. Then, click on Clusters -> Create Cluster. Choose Networking only and hit next. Enter example name or optional tags, if needed, and hit create.
Back in ECS window, hit Task Definitions -> Create New Task Definition, choose fargate and hit next. Enter a task name and choose the container role which was created in Prerequisites sections. This is a role that makes assuming a role inside a container available.
Task size depends on complexity and performance you want to achieve. I suggest starting with the lowest number and make it higher if the task fails due to memory exception, or if the performance of the running task is extremely low.
In the container section, create a container with the path to the image (pattern is given).
Add optional tags if you will, and hit create. Now, you should be able to run your fargate task and start the copying process.
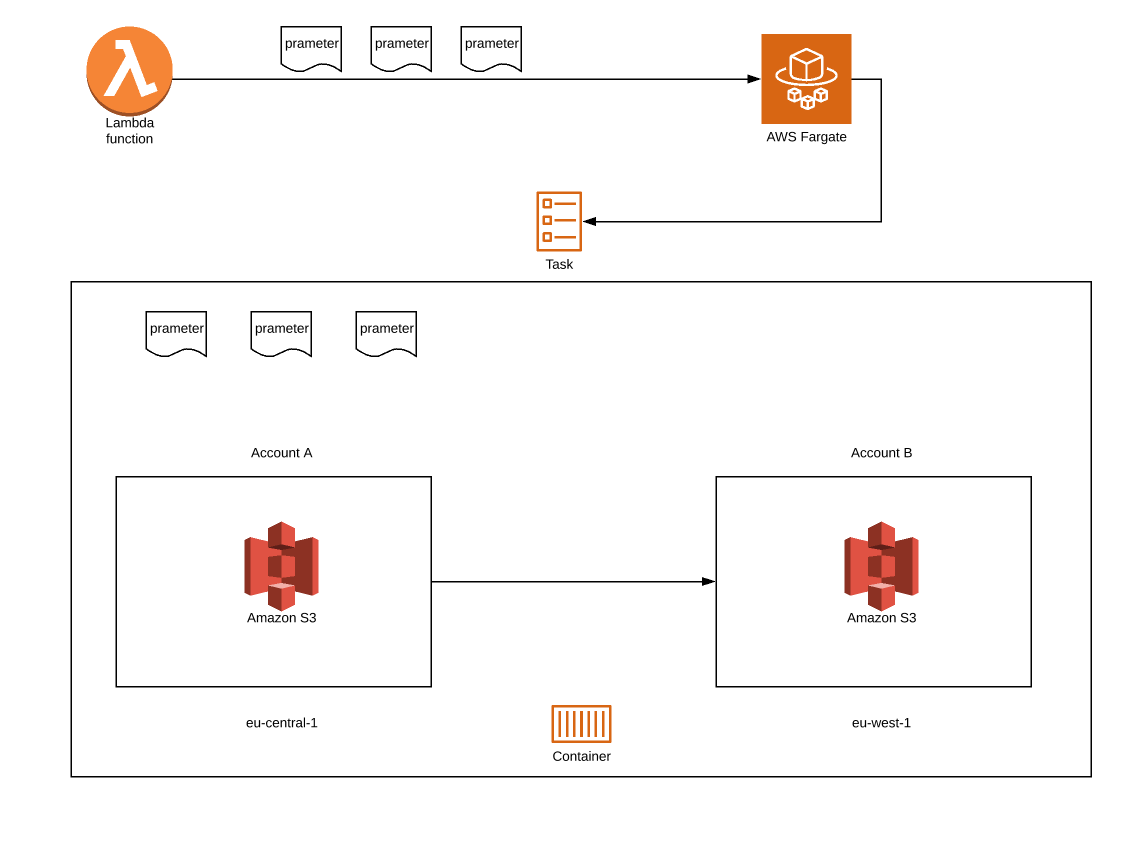
You can use AWS management console to run tasks. But to make it even more serverless, we will use lambda. Below, you can see a code that will help us do that.
First and foremost, before running a task you need to give lambda access to ECS service. We will use boto3 run_task.
Now, you can run your lambda and watch how your copy task starts. You can watch your task logs using cloud watch or inside the cluster. You can simultaneously run as many tasks as you want.
For now, at least. We’ve created our first copy tool, but it is not the end. With fargate power we can expand functionality of our tool and prepare some new scenarios and features. You will learn more about image security from our next articles. You’ll also learn how to copy your object’s ACL, how to migrate your buckets, and how to refresh a role token if the process of copying takes more than a while. Plus, everything about using fargate. I hope you’ve managed to reach the end. I am really looking forward to solving new issues with fargate. If you are too, wait for the next part. See you soon!


We'd love to answer your questions and help you thrive in the cloud.


